Showing posts with label recipes. Show all posts

Saturday, November 22, 2014

Quick, Yummy, Easy

Pumpkin ravioli, brown butter sauce, toasted pecans over a bed of sweet lettuce. 
I think you need to have this in your 30 min or less recipe box. :)

Monday, October 20, 2014

Fall deliciousness

Fresh from our apple picking mt. trip! #nothingbetterthenhomemadeapplesauce

Wednesday, October 1, 2014

3 Foods

I'm sure there will be time to come when I can play around on my photography again and have some fun spending hours shooting something only to use 3 photos of the 300.  But until then I am sharing a few new recipes and the so so photos.  I knew when I started to photograph that they probably wouldn't turn out.  The lighting in my kitchen is poor.  The black countertops reflect back since they have some shine. My lens is great, but not the best for multiple points of focus on a plate. I can't use the manual setting very well with the camera body I have.  Alas, I wanted to try and maybe grab a good shot here or there.  I do have one thing going for us at the Hime house...the lighting in the livingroom/dining room.  The natural lighting is perfect so much of the time.  

And for the recipes, they really are good!  I'm putting them on the rotation for awhile and a bonus is the kids and company like them too!  If you are in the mood to try something fun, check these out.  Then let me know what you think.  
Happy Cooking!
........................................................
Saturday Football Food. Delicious. 
I know this photo might not look appetizing.  Seriously, it just doesn't.  But don't let my photo fool you-photo=poor, food=awesome.  Not to mention the item in focus is the silver spoon and not the food. Boo. But you should FOCUS on the FOOD!  
Pinch of Yum is a favorite fun foodie blog that Justin and I both enjoy.  This is her Cheesy Chili Dip. And the best part of this recipe?  I learned how to make a homemade "velvetta" cheese sauce and I'm not going back to the processed stuff, ya'll!
The second photos are to encourage us to make the same old foods in different and new ways.  These are Egg Pies.  We eat a lot of eggs at our house and lately it is common to hear, "but, I don't want egggggggsss".  So Justin decided to make egg pies and it has been a fun change of pace.  If you don't have any ramekins in your cupboard they are a fun addition to your dishes!  Anything made or put into a ramekin is for sure to at least peak your children's interest.  These scrambled egg pies have salt/pepper, cheese, a few minced veggies and some almond milk.  It looks fun on the plate and our kids gobbled them up! The scone on the right is delicious.  And because I promised the chef of the recipe I'd only give the recipe out if I demonstrated it first, you'll have to somehow get a demo from me to gather the recipe. But I'd love to share with you!  They are some of my favorite. foods. ever.

 And finally. I'm not much of a fan of the crock pot. It's not that I don't like to use it, its simply that I don't have lots of recipes that I love.  I'm slowly trying to change this as it does make the dinner prep much easier when done in the morning.  

Therefore introducing to the Hime house, Crockpot Carnitas.  Delicious. Simple. Great as leftovers. 

I used this recipe for the meat. (for the slaw, I have to admit I used Trader Joes Super Sweet Frozen Corn-love that corn!)  This recipe for the enchiladas sauce recipe. And this recipe for the pickled onions. This recipe for the tortillas. And This guacsalsa recipe. Now before you think I must be amazing making everything homemade, rest assured it all just came together as one great, everything homemade, meal. I didn't plan it that way.  Really, I didn't.  One little honest thought did sneak in...  Wow, how did that happen?  Take that processed, in a can or plastic wrap, food! High five to me!

It all came about...I was out of tortillas so I used the recipe I have used twice before-hoping it turned out to be an edible tortilla.  The pickled onions I made last month which are a game changer in our home.  You can use them on ANYTHING.  They are sweet and slightly pickled.  Ooooh, love these. The guacsalsa Justin made since I had tomatillas from the produce box we get each month.  The guacsalsa is a beloved recipe learned and perfected about 4 years ago. And the enchilada sauce was a google search since I didn't want to pay $5 for an 8oz can of sauce that consists of a can of tomatoes with spices. So within seven years this is the first time I can say, all that I could make, I did make from scratch. It does floor and amaze me that a few generations ago things were either made from scratch or they didn't have them.  I could even make this recipe more homemade if I learned to can roasted chilies or rice vinegar or grow our own tomatillas. We have so many wonderful things at our fingertips these days! I don't know when it will happen again, but as easy as this one way, it should happen within the next month or so. Go try out this meal.  Make some or all of it homemade.  High five yourself and then simply enjoy it as yummy!

Monday, September 15, 2014

Sourdough bread

1st attempt...
Decent
More like a sandwich loaf then artisan bread.
More attempts to come!

Monday, May 6, 2013

What is it?

The very normal discussion at the lunch/dinner table. Anteater? Elephant? Bear? Dolphin? Elf Shoe? Our food constantly evolves at the Hime table. :)


Thursday, March 7, 2013

OOOOOooooh, A Simple Pasta Night for Ya!

I have made this pasta two times and it is simple and wonderful!  It has great flavor and is fast to make.  I think uninterrupted (I put on a Busytown Cartoon :) I made this recipe in 20 minutes with some of the dishes washed too! It is from Pioneer Woman and it should make your menu sometime soon!  Check it out if you want to see her famous photos and recipe. The only thing I changed...instead of cream I used a Almond Milk and 1/2 & 1/2 mixture since that is what I had on hand.  I also added peas and we loved the addition.  The bonus about this recipe?...every ingredient can be found at Trader Joes, wahooo!

Pasta with Pancetta and Leeks

Prep Time:
 
 
Cook Time:
 
 
Difficulty:
 Easy
 
Servings:
4

Ingredients

  • 12 ounces, weight Pasta, Cooked Al Dente
  • Reserved Pasta Water, If Needed
  • 3 ounces, weight Chopped Pancetta
  • 3 whole Leeks, Sliced Thin
  • 1 Tablespoon Butter
  • 1/2 cup Dry White Wine
  • 1/2 cup Heavy Cream
  • Salt And Freshly Ground Pepper, To Taste
  • Parmesan Cheese, Shaved

Preparation Instructions

Cook pasta and set aside. Reserve 1/2 cup of pasta water.
Saute chopped pancetta until fat is rendered and it starts to brown. Add sliced leeks and cook for 8 minutes. When you add the leeks, you can also throw in a pat or two of butter if you want to. This’ll give the dish some scrumptious flavor. I add it after the bacon is browned because I don’t want the butter to brown. After 8 to 10 minutes, pour in wine, then cook an additional 1-2 minutes, until reduced. Reduce heat to low, then pour in cream. Add salt and pepper to taste. Stir in Parmesan shavings. Toss in pasta, adding a little pasta water to thin as needed. Serve with Parmesan shavings over the top---delicious!

Pumpkin in March

We made this for snack today since I had pumpkin in the freezer that needs to be used throughout the year and before next fall. :)  It was amazingly moist, simple, delicious and easy/fast to make. Will certainly be making these again!
And for those that don't think cake is good for breakfast...these are basically pumpkin pancakes-whats the difference?
(taken from Google images)

Bumpkin Bars

2 eggs
1/2 cup real maple syrup 
1/2 cup melted butter or coconut oil (I used salted butter)
1 cup pumpkin 
1 1/3 cups flour (I used part spelt, but I am sure unbleached would work)
1/4 teaspoon salt 
2 teaspoons pumpkin pie spice
3/4 teaspoons baking soda
1 teaspoons baking powder


In a medium bowl, combine dry ingredients with a whisk. In a large mixing bowl, mix remaining ingredients until thoroughly combined. Add the wet ingredients to the dry ingredients and mix well to combine.

Pour into a greased 8x8 glass pan. Bake at 350 for approx 30 minutes, or until toothpick inserted in the middle comes out clean. 
Makes about 9 medium bars.

(adapted and copied from The Nourishing Apron)


Saturday, September 8, 2012

2 Recommendations

If you want great Books on CD then buy these and I think you will LOVE them...you and the kids!  They have been awesome. We haven't listened to much else except these in the car.  Owen and Katie have both enjoyed this immensely! Thanks Bee for telling me about them!
They are from Radio Theatre of Focus on the Family.  I found Amazon has them the cheapest.  

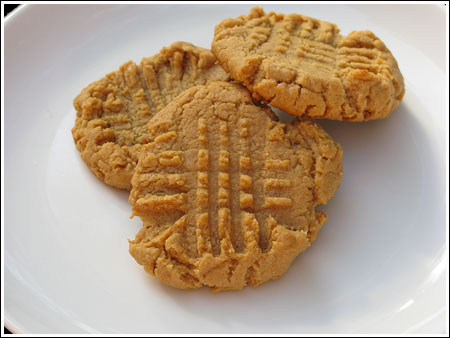
Easy Peasy Delicious Peanut Butter Cookies (adapted from Paula Deen)

1 cup peanut butter-(I used one that was only Peanut Butter and salt)
1/2 cup sugar (I used granulated honey)
1 t. baking soda
1 t. vanilla
1 egg
(optional-mix or press on top, chocolate chips into them)

Hand mix these all together
Make into golf ball size balls on ungreased pan
Criss Cross them with a fork for that traditional peanut butter design
bake for 10-12 minutes at 350
allow to cool for 5 or so minutes

Makes approx 12 cookies
Happy Eating! 

Monday, August 13, 2012

On Making Spaghetti

Katie and Owen requested Spaghetti this past weekend for dinner.  Noodles are a sure favorite at our house.  Justin went to the store and bought some angel hair noodles and a jar of sauce. Katie had asked for this meal a few days ago and I forgot to plan it.  So I made dinner within 20 minutes (which was nice) and we sat down to eat.  We got half way through our bowls and then were surprised.  Neither of the kids liked the meal.  They ate a portion of it and then said they were finished.  Why? I asked.  They both agreed that this noodle and sauce was not good compared to my 'awesome'-Katie's word-homemade sauce.  It caught me off guard.  For the first time my kids out loud said they preferred something homemade and they could tell the difference in store bought/can/jarred sauce.  I was thankful.  This is something that I really want for my kids.  Not that they are food snobs and I definitely don't want them to be...  -And if you have us over for dinner we will eat WHATEVER, THANKFULLY!  But I am grateful that they like real food.  Foods that have been seasoned correctly.  Foods that take a bit of time to make.  Foods that are full of nutritious stuff.  And I am glad to be able to make it for them.  The meal table hasn't always been a easy place.  Sure there are some meals my kids would prefer to NOT eat.  But someday I would love to have my kids home from college and have them ask for my bread or whatever their tummies want.  I love when my family comes in and says it smells good in here because of something cooking.  I want them to have good memories around food.  I want our family to fellowship around the dinner table.  
I want them to see and taste that the Lord is good!
It was a great reminder that good food doesn't have to take a lot of time (though it can), but it does take intentionality and planning.  And I am finding it is worth it!

-Please don't hear me saying that I make the following recipe all from scratch.  I never have used my own homegrown tomatoes, made noodles or grown the other ingredients...By homemade I am referring to putting together the bulk of the meal.  I am sure others are really making it completely homemade-way to go, I need to learn from you!

-Does anyone have a good jarred spaghetti sauce?  I'd love to have one on hand for the times when things like this do happen. 

Here is our best noodles and sauce recipe!

Lady and the Tramp Spaghetti and Meatballs
-this is always delicious and it freezes well.  Oh and it is a great meal to share!

Sauce:
1 cup Onion
1 T Olive Oil
1 T Butter-optional
1 Can 28 oz Stewed tomatoes (have more flavor) -but I have used diced before and 
   they worked fine
2 Cans (6 oz each) tomato paste
1 T Honey
1 t salt
1 t basil
1/2  t oregano
1/4 t marjoram
1/4 t paprika
dash pepper

Meatballs:
2 eggs
2 garlic cloves minced
1 T parsley
1 lb ground beef
1/2 cup seasoned bread crumbs
1 cup grated parmesan-optional

Sauce-
1. Sauté onion in oil and butter until tender and sweet
2. Stir in tomatoes-cut them up if you want a smaller dice, paste, honey, and seasoning 
3. Bring to a boil and reduce heat to low.  
*If just using sauce without meatballs, simmer for at least 30 minutes.
*And if you like more seasonings, season away!

Meatballs-
1. Beat eggs, garlic and parsley
2. Add beef and mix well
3. Sprinkle in cheese and bread crumbs-mix in gently
4. Shape into 1 inch balls-add these to sauce

Cover and simmer about 45 minutes.
Server over pasta or rice

I normally double this if we have company or if I want to freeze some.  Also good as meatball subs!

Thursday, July 12, 2012

Salads, Soups and Stir Fry, OH MY!

An idea for food planning:
Justin and I were able to attend a local food demonstration at the Savory Spice Store, yesterday, and met the chef from Tarheel Foodie, Susan Sink.  She is very down to earth and has some great recipes.  80% of what she makes is local and in season.  I think that sounds pretty fun!  The meatloaf we tried was wonderful as were the potatoes and grits.  
So if you are looking for a way to prep and cook 3 meals in one, the article might give you some great tips and recipes!
Article (from Tarheel Foodie) very helpful for meal planning!

Saturday, July 7, 2012

A few things I love right now

(all photos from google images)

My toaster oven.  Even though we have a microwave we don't use it really at all.  I love that the toaster oven can cook my eggs for smashables in the morning.  It can reheat our left overs making them toasty and not turn into rubber.  I can toast 4 pieces of bread at once.  And I can even cook some other tasty treats leaving my kitchen much cooler then if I had turned on the regular oven!

Friends and pools.  Thankful for these things as the last 7 out of 8 days have been over 100!
Still a staple in our house...ice cream for dinner anyone??  :)
Plus, if we have leftovers they make great milk shakes with a little almond milk and pb.  OH YUM!
LLBean tote bags.  They last forever.  I bought our this spring with a gift card.  I have the medium and a large.  I love both, but for a family the large bag with a zipper and handles is wonderful!  Works great as a library bag, pool bag, overnight bag, you name it, it works for anything!
(the second from the left is the large)
Cold Brewed Coffee.  Even though I am limiting my caffeine because of being sensitive to it...I LOVE some decaf coffee made this way!  It lasts in the refrigerator for 3-4 weeks, is super smooth not bitter and easy to make.  All those are a winning combo for us!
Any music by Sara Grove.  
Summer Flowers bring such color and joy to our home.  I love sunflowers, hydrangeas, dahlias, daisies,   purple cone flowers, baby breath, lilies...the colors are bold and beautiful!
This amazing photo was taken in CO from google images. Breathtaking!
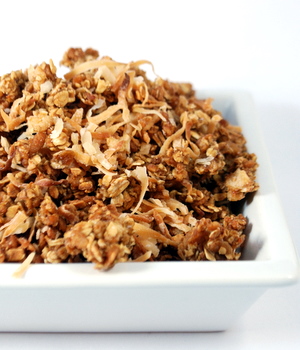
And Granola.  
I have finally made a good batch!  I tried a few times throughout our marriage, since Justin LOVES granola and it has always be unsuccessful.  
Here is the recipe that has worked. YAY!  I now feel a bit more confident and might try another version soon!

PB Granola Recipe.
Makes a lot!
I normally make a whole recipe then bake 1/2, saving the other 1/2 (in the frig.) for the following week to bake.   
Make sense?

1.Mix:

12 cups rolled oats
1 cup unsweetened coconut flakes
optional-1 cup walnuts or 1 cup pecans or 1 cup sunflower seeds

2. Melt in a pan on the stove:

1 1/2 cups coconut oil, raw
1/2 cup maple syrup
1/2 cup honey
1/2 cup peanut butter
3 T vanilla
2 T cinnamon

3. pour melted mixture over dry mix and blend until completely mixed and wet.
4. Bake at 320 for 20+ minutes-I usually do mine closer to 25 minutes, stirring it 1/2 way through
5. Remember when you pull the granola out of the oven it won't be crunchy yet.  After it cools it will be delicious and crispy!
6. Store in air tight container!

Thanks Beth for this wonderful recipe!!

Tuesday, July 3, 2012

Keep'n berries fresh

I received this tip from our local spice shop!

Berry-Liscious!
For those of you not on Facebook, we thought we would share this awesome tip to keep those berries we buy at the farmer’s market (which can be expensive) from getting moldy overnight!  This is one worth sharing again! Pass it along to all your “berry” friends.


Berries are delicious, but they're also kind of delicate. Those raspberries, in particular, seem like they can mold before you even get them home from the market. There's nothing more tragic than paying $4 for a pint of local raspberries, only to look in the fridge the next day and find that fuzzy mold growing on them.

With fresh berries just starting to hit farmers markets, we can tell you how to keep them fresh! Here’s a good tip on how to prevent them from getting moldy in the first place.  Wash them with vinegar! Yep, it's true!  When you get your berries home, prepare a mixture of one part vinegar (white or apple cider works best) and ten parts water. Dump the berries into the mixture and swirl around. Drain, rinse if you want (though the mixture is so diluted you can't taste the vinegar) and then pop in the fridge.

The vinegar kills any mold spores and other bacteria that might be on the surface of the fruit, and voila! Raspberries will last a week or more, and strawberries go almost two weeks without getting moldy and soft.  So go forth and stock up on those pricey little gems, knowing that now you can keep them fresh as long as it takes you to eat them.

Friday, June 15, 2012

Gyros


Gyros

These are delicious, easy and at least our kids love them. 

Serve with a greek salad and/or hummus and pita.  

Oh and don't forget to add some cucumber yogurt sauce!  :)

*Sorry about the strange font colors and sizes*

Gyros (serves 6)

1/2 lb ground beef

1/2 lb lean ground lamb 

Directions:


  1. 1
    Combine ingredients in a bowl, and shape into 1/2 inch thick patties.  Place on cookie sheet.
  2. 2
    Broil 8-10 minutes until no longer pink.
  3. 3
    Slice thinly and serve with pita bread or naan bread, sliced tomatoes, thinly sliced onion, lettuce, cucumber yogurt sauce.


  • 1 cup plain fat free Greek yogurt
  • 1/2 cucumber
  • 3 garlic cloves
  • salt
  • olive oil (optional)
  • fresh dill (optional)
  • 1 Peel the cucumber and remove the seeds. Grate coarsely. Put the grated cucumber in a bowl and sprinkle generously with salt. Let sit for 10 minutes, then drain and squeeze out as much liquid as you can. If you're concerned about salt, rinse the cucumber and squeeze again.

  • 2 Peel and mince the garlic. I love garlic, so you may want to use a little less.

  • 3 Mix the cucumber, garlic, and yogurt. Let sit for a bit to mingle the flavors.

  • 4 Optional: Add olive oil and or minced fresh dill-I think dill makes this delicious!


Tuesday, May 15, 2012

Reinventing My Salad Taste Buds

A while ago I posted about teaching our kids to enjoy salads, and yes I said, "teaching',   :)
and now I am more convinced then ever.  

Three things have pushed me again to take up salads-once a day, 1. watching Forks over Knives, 2. eating at Chop'd in DC and 3. going to a plant based workshop.

The benefits of salads are amazing.  No one will disagree with all the nutrients present in a dark green leafy salad.  But not all salads are equal.  We've tried around here to do salads before.  Justin would take them for lunch, I'd make one for the kids and I, but eventually I get tired of eating like a rabbit (hehe thats something my dad would say:).  

But enter a NEW way to eat salads.  Nothing fancy.  No new ingredients.  But simply a chopped salad that blends all the ingredients together and makes a wowwowzer of a salad.  It is also a GREAT way to use lots of lettuce with only a few ingredients BECAUSE when it is finely chopped a little bit of each ingredient sticks to your greens.  
After going to Chop't in DC and watching them transform my salad taste buds I am not going back. 

Wanna give it a try? Here's what you do:

1. Take a large cutting board and place all ingredients in the center-my first photo.
2. Using your chef knife or a rolling knife like this one, chop up everything really well!-my second photo.
3. Drizzle on some dressing, mix it up on the board and then scoop up into bowls.
4. Presto, delicious salad where every bite has something on it.
Let me know if you try it...I think you will agree...salads are once again delicious down to the last bite!


Here are a few new salads for you to try-most taken from the Chop't website.  I also included the dressing I used per salad.

1. Mexican Caesar-grilled chicken, monterey jack cheese, green pepper, tortilla chips with a mexican Caesar dressing
2. Sub Salad-salami or pepperoni, green/black olives, feta, tomatoes, red onions, sweet orange/red peppers, banana peppers with a Italian Salad Dressing
3. Cobb Salad-hard boiled egg, bacon, grilled chicken, avocado, tomatoes, crumbled blue cheese with a dijon vinaigrette dressing
4. Harvest Salad-Sunflower seeds, apple slices, craisins, blue cheese with a dijon vinaigrette dressing
5. Simple Salad-Coconut flakes, feta cheese, with a splash of Roasted Walnut oil and lots of freshly squeezed lemon
6. Color me Salad-cucumbers, tomatoes, peppers, green onions, pecans, craisins with your favorite dressing.
7. Greek Salad-feta cheese, olives, tomatoes, cucumbers, cubed baked potato, red onions with a greek dressing
8. Taco Salad-Taco Meat both/or black beans, tortilla chips, tomatoes, corn, green onions, cheddar cheese, avocados, topped with salsa
9.Tropical Salad-Mango, pineapple, cashews, grilled chicken, avocado and with lemon juice or tropical salad dressing
10. Asian Salad...haven't tried this one yet, but on the menu soon

*We are trying to increase our veggie consumption and any meats and cheese on our salads are on the low end.  Still very delicious!
*Add salt/pepper if you want-I normally add a titch of both.
*Salads as meals are pretty easy to clean up! Yay!
*Add some sourdough bread, or pitas to your salad to round out your meal
*Most salad dressing recipes make large batches....I scaled down each recipe just to try them.
*Update-OUR KIDS LOVE SALAD.  Somedays Katie will take 3rds.  :)  And once we get Owen to take a bite he eats his entire bowl willingly!


Friday, May 4, 2012

Our go to snack


In the Hime household no day lately is complete without at least one energy bite or two or three.  :)  

No-Bake Energy Bites -taken from Smashedpeasandcarrots
(makes 18-20 bites)

1 cup oatmeal
1/2 cup peanut butter (or other nut butter)-I use a bit of butter and peanut butter
1/3 cup honey-I use Maple Syrup
1 cup coconut flakes
1/2 cup ground flaxseed
1/2 cup mini chocolate chips
handful of dried cut up cherries 
1 tsp vanilla

Mix everything above in a medium bowl until thoroughly incorporated.  Let chill in the refrigerator for half an hour.  Once chilled, roll into balls and enjoy!  Store in an airtight container and keep refrigerated for up to 1 week.

**PPS.  Many of you have commented about substitutions and YES!  you can substitute almost anything for any of the ingredients to work around food allergies, special diets, etc.  Soybutter, almond butter, cashew butter, sun butter, etc all works in place of peanut butter.  You can use creamed or liquid honey, or agave nectar or even maltitol syrup in place of the honey.  If you do not like or cannot eat coconut try some type of crushed cereal, wheat germ, whole wheat flour, granola, cocoa powder...the possibilities are really endless.  If you cannot find ground flaxseed you can buy it whole and grind it yourself in a coffee grinder or magic bullet or you can substitute any other dry ingredient in it's place.  Yes, the mini chocolate chips can be regular sized or carob or you can use raisins, cranberries, goji berries, or crushed nuts (almonds, cashews, walnuts, whatev) of some kind.  

I know writing out all these substitution possibilities seems silly but you will not believe the amount of comments and emails I get every day about "Can I use this instead of this? or "I don't like this ingredient, what can I use instead?" etc.  Just remember, if you make any substitutions you may have to play with the quantities of dry to wet a bit to ensure you have a mixture that can be rolled into balls (if you want to eat them in a ball-shape, you don't have to do that either!)  It's a really great recipe to play with so please don't worry about adding in a different ingredient if you cannot eat a particular one due to allergies, etc.  My motto is always, 'Just try it, you might like it' when it comes to making these.  We change it up depending on what is in our pantry and you can too!  Oh!  And you can also make these vegan and paleo-friendly, it's just a matter of buying the right ingredients, we do it all the time!  ENJOY!   

Saturday, March 10, 2012

A Food Idea for Spring

I've been in a slump these days for food ideas.  Well, if truth be told it has been a slump for a few months. But it's ending as the season is changing to spring and we are eating some yummy new things!  We joined a local small coop that runs to the State Farmers Market once a month and we get a HUGE box of goodies.  One thing we received was pounds of carrots.  They were large, sweet and I've found ways to use them up!  One new recipe that I wanted to share is Bunnies Eat It Soup (carrot soup :)  Now, before you think you have no desire to try it, at least tuck it away in case you wanted something new to try and have some carrots. Justin and I really enjoyed our bowls and the kids liked it, but I did give them small bowls.  They did happily finish it.   :)


Bunnies Eat It Soup:

  • 3 pounds carrots,  peeled & chopped
  • 1 Onion, chopped
  • 6 cups chicken stock
  • 3 cloves garlic, chopped
  • 2 tablespoons dried dill weed
  • 1/4 lb butter (1 stick)
  • 1 1/2 teaspoons salt


  1. In a medium sized stock pot, over low/medium heat add butter and sauté the carrots and onions for 10 minutes. Add garlic last 2-3 minutes.
  2. Combine sautéed veggies, chicken stock and salt. Bring to a boil, reduce heat and simmer for 30 minutes or until carrots are soft.
  3. In a blender (or with a hand blender), puree the soup, return to stock pot and simmer for an additional 20 to Season with dill and/or garlic if needed.

Then there is this salad....I am addicted to this.  It is SO simple, SO easy, SO fresh and graces our table every few nights.  Thanks to some new sweet girls we met and had us over for dinner!  This recipe rocks!

Roasted Walnut/Lemon Salad:

Lettuce
1 lemon-squeezed
Roasted Walnut oil (can be found at Lowes foods)
Dried Coconut flakes (I found some at Whole Foods, though you could leave these out)
Feta Cheese
Salt and Pepper to taste

1. Place lettuce in bowl and drizzle entire squeezed lemon over the lettuce.  Using clean hands mix the lettuce and lemon juice...making sure to get it all over the leaves.

2. Add dried coconut flakes, handful of feta cheese and mix again.

3. When ready to eat drizzle with as much oil as you would like.  Then grind some salt/pepper over the top and enjoy.